
Piztu is a specific customization of the Zettlr software, into which code modifications have been introduced. Zettlr is a general-purpose Markdown file editor, a project developed and programmed by the German Hendrik Erz, distributed under the GPL-3.0 license.
I want to express my gratitude to Hendrik for his exceptional work, without which it would not have been possible to develop Piztu. Therefore, the credit for Piztu largely goes to him. You can find more information about the Zettlr project at:
It is worth noting that Piztu is an adaptation of the Zettlr program, designed specifically to be a useful tool for teachers. As will be explained later, it can be easily customized to adapt to other groups and professional activities.
It is important to note that if you install a Zettlr update, you will lose all of Piztu’s specific functionalities.
And what can Piztu do for us in our teaching work? Here are some of its possibilities:
- A text editor
- A system for organizing student and subject information
- Management of incidents and classroom notes
- Subject diary by sessions
- Automated creation of tutoring reports
- Creation of follow-ups for teaching units
- Editing the department’s minute book
- Final course report
- An AI editor for creating didactic material, assignments, exams
- A multi-language translator
- Curriculum tracking
- Editing in Markdown and LaTeX
A. GNU/Linux Debian and Derived Distributions
To ensure the utilities work on Debian, your system should have Python3, pip, and python3-venv installed. You can install these programs using the terminal or a package manager like Synaptic.
First, check if Python and pip are already installed:
Bash
python3 --version
pip3 --version
If they are not installed, or if the versions are not appropriate, proceed with installing the following tools, including the Qt development version needed for the project.
Bash
sudo apt update
sudo apt install python3 python3-pip python3-venv
sudo apt install qt6-base-dev libqt6core6 libqt6gui6 libqt6widgets6 libqt6dbus6
After installing the packages, it’s advisable to restart your computer to ensure the changes are applied correctly.
When you open the terminal again, the python command might not work directly, but the python3 command will. To avoid having to type python3 all the time, you can create an alias. This will make your system understand python as a synonym for python3.
Bash
nano ~/.bashrc
and add
alias python='python3'
(to save Ctrl+o and to exit Ctrl+x)
To ensure this alias remains every time you open the terminal, you’ll need to add it to your shell configuration file (.bashrc or .zshrc, for example).
B. MS Windows
Python Installation
To ensure Piztu utilities work correctly, you must install the following programs on your computer, if you don’t already have them. Don’t worry if you’re not familiar with them, they are necessary tools for Piztu to run its scripts.
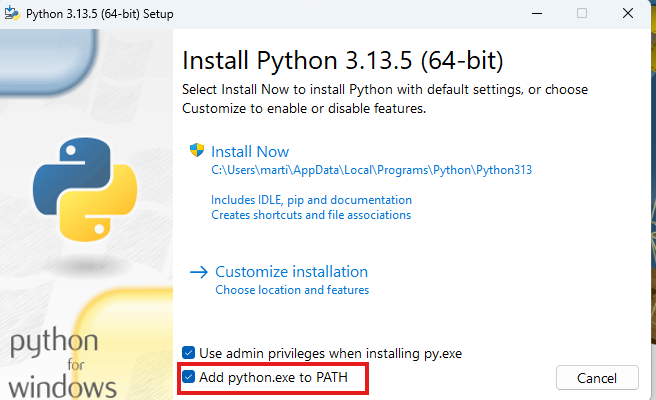
- Python To download Python, simply go to the official website. At this moment, the latest stable version is 3.13.5, but there might be more recent versions available.https://www.python.org/downloads/Note: During installation, it is very important to check the box “Add python.exe to PATH”. This option allows the system to find and use Python automatically. If you don’t check it, the Piztu utilities will not work correctly.
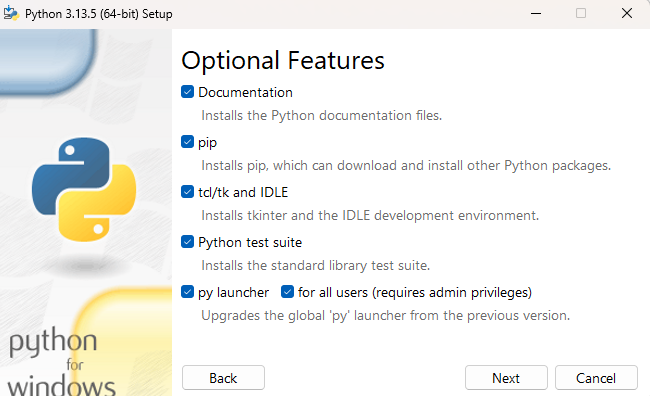
If we click on Customize installation, we’ll get the following view:
After installing the program, you should restart your computer. Next, check the installed Python version to confirm that the installation was successful.
python --version
Python 3.13.5
pip --version
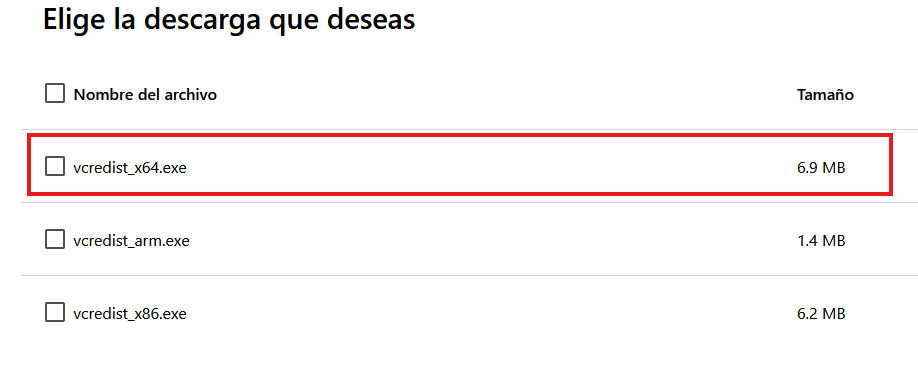
pip 25.1.1 from C:\Program Files\Python313\Lib\site-packages\pip (python 3.13)2. Visual C++ Redistributable Packages
Finally, we will also need to install a small utility for Windows
https://www.microsoft.com/en-us/download/details.aspx?id=40784
Download the Piztu Program
Download Piztu from the following link:
For installation, simply follow the steps and continuously press “Next” until completion. In the case of installation on the Windows operating system, it may ask if the user wants public and private networks to access the api_multiprocess application, to which you should respond affirmatively.
Start Editing: Compatibility with Obsidian and LibreOffice
Once the program is downloaded and installed, you can start editing notes, relating them to each other, and adding images, hyperlinks, etc.
This interrelation between notes allows for the Zettelkasten methodology, which is an excellent way to keep information organized and easily retrievable. If you search for “Zettelkasten” on YouTube, you will find many explanatory videos.
Another feature of Zettlr is that it edits in Markdown. This ensures that you will always have your data available, as they are plain text files with the extension .md that you can open with any editor (such as Notepad, Gedit, Kate, or TextEdit). Since the information is not stored in a database, you will never lose access to your notes. This is a great advantage for those seeking free and simple tools.
Since Zettlr generates plain text files, it is compatible with Obsidian and LibreOffice, which supports Markdown from version 25.08 onwards.
As Zettlr currently does not have a version for mobile devices, you can use Obsidian to view or edit your notes. However, it is important to note that in the Obsidian version, you will not have access to Piztu’s tools, as these are specifically programmed for Zettlr, which is open-source software, unlike Obsidian.
Create the Workspace
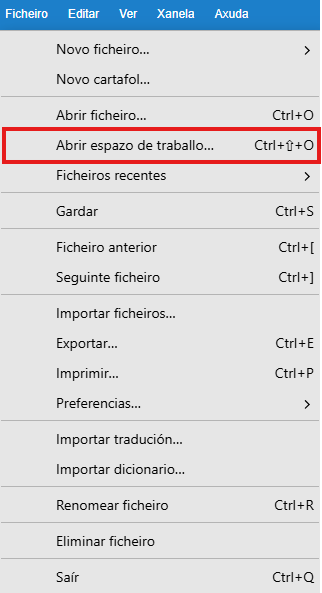
On the drive of your choice, create a new folder using the Windows file explorer. All your notes, student data, etc., will be saved in this folder. Once the folder is created, return to Zettlr and click on “Close Workspace” that you have active and then click on “Open Workspace…”.
After opening the program, the left column will be empty, and on the right, you’ll see the script “00._Registration_and_Download”. This script will allow you to register in the Piztu virtual classroom and download the program’s utilities. In the next step, we will explain how to do this.
We can think of Piztu as a tractor. On one hand, we have the machine or tractor head, which is what you just downloaded and installed. On the other hand, we have the utility scripts, which are like the implements (the cart, the plow, the cistern). Our goal is to provide these tools to Piztu so that it is useful to us.
Video of the installation process on Windows
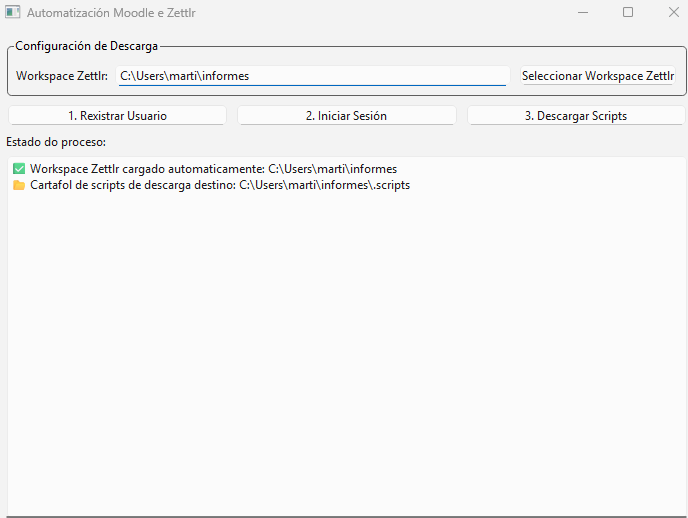
Now, click on 00. Registration and download.
In some distributions like Debian 13 or distributions with a Wayland graphical server, it doesn’t automatically install the necessary libraries, and as a result, the previous window does not open. In short, it doesn’t work.
- Select the Zettlr workspace
Click on “Select Zettlr workspace” to choose the folder where you will store all your information. You can place it on your preferred drive, even on a USB drive.
2. Register the user

The data you enter in the form is sent to the virtual classroom of the following domain:
Your email address will be the user to access the virtual classroom. With the email (which, I repeat, will be your username) and the password, you will also be able to enter the virtual classroom traditionally.
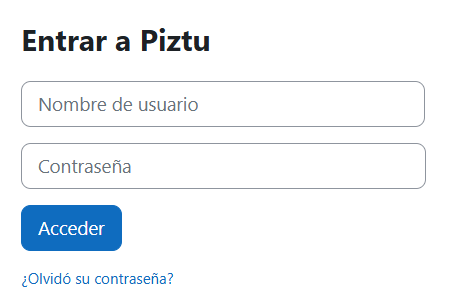
Once you register on the platform, after completing the form and not forgetting your credentials, click on the “Log in” tab and proceed with the login. You have the option of a checkbox to remember the password, which can be convenient if you are not using a shared device.
3. Download the scripts
After registering, click on “Download scripts”. The program will download a compressed file from the virtual classroom and automatically decompress it into the subfolder .scripts of your workspace. You will see a set of scripts appear immediately in the right column.
When you download the scripts, you will see that the computer initiates a library update cycle necessary for the operation of the various utilities. However, you must let the computer work at its own pace, as this is a process that can be longer or shorter depending on the network connection and the characteristics of the computer itself. In any case, you must wait for the process to finish until the script buttons work.
Customize Zettlr – Piztu
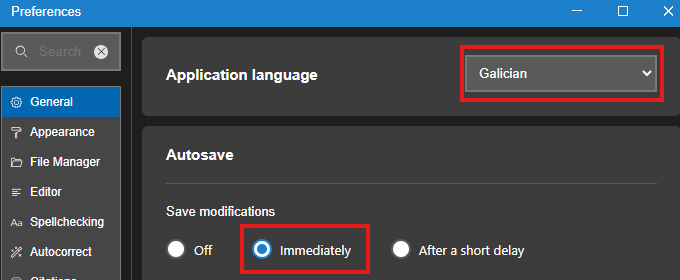
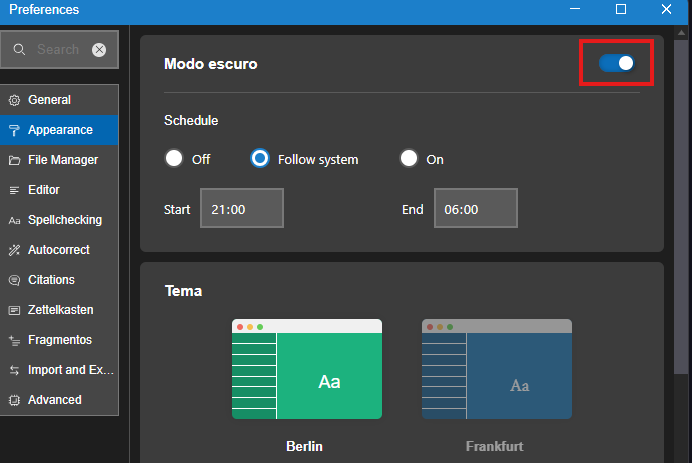
Zettlr allows for customization, enabling us to change the language, auto-save, dark background, etc.
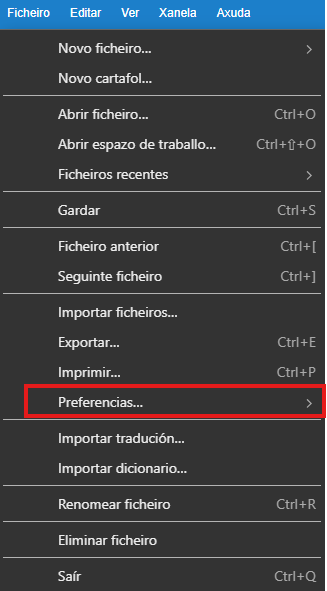
For changing the language and auto-save
To activate the dark background:
Customize the Utilities
Piztu proposes a series of scripts that are useful for teaching, but the program can be perfectly adapted for other uses, such as for students, patient management by a healthcare professional, and much more. However, the default scripts proposed are very specific for teaching and classroom management.
Any user can remove the proposed scripts, modify them, or add their own. Nowadays, with the help of artificial intelligence, creating scripts is within anyone’s reach. You can use the proposed scripts as examples and modify them until you achieve the desired functionality, with the help of tools like Grok, Gemini, Claude, etc. Certainly, it will become increasingly easier to achieve the expected results.
All the proposed scripts are programmed in Python and use a graphical interface with pySide6. Remember that all scripts are saved in the .scripts subfolder of your chosen workspace. If you do not want a script to appear in the right column, simply open that folder with your operating system’s file explorer and delete it. It will automatically disappear from the column. If you wish to translate the names of the utilities, simply rename the script folders.
If you want to create new scripts, you just need to create a new folder inside the .scripts directory of your workspace. Inside this new folder, you will need to add three files:
- The Python code file, with a
.pyextension. - The
requirements.txtfile, where you define the necessary Python libraries for the script. - The
metadata.yamlfile, where, besides your data and a short description, you must add theentry_point, which tells Zettlr the name of the file to execute.
For example, if the script is named temporaliza.py, the entry_point will be configured as follows:
YAML
entry_point: temporaliza.py
In any case, I will continue adapting and improving the scripts, adding new functionalities to Zettlr.
Piztu Teachers employs artificial intelligence in many of its processes. To do this, it is necessary to have several services contracted. Piztu functions as a bridge that connects two programs or systems, facilitating their communication.
To understand it better, you can imagine you are in a restaurant. From Piztu, you order some dishes from the waiter, which would be the API. This waiter goes to the kitchen, the artificial intelligence engine, and returns to your table with the delicious dishes ready to eat.
Some services are free, others are paid. It is evident that the quality of results varies (not all restaurant kitchens offer the same quality in their dishes). It is up to the user to decide which ones to hire based on the use they want to give them.
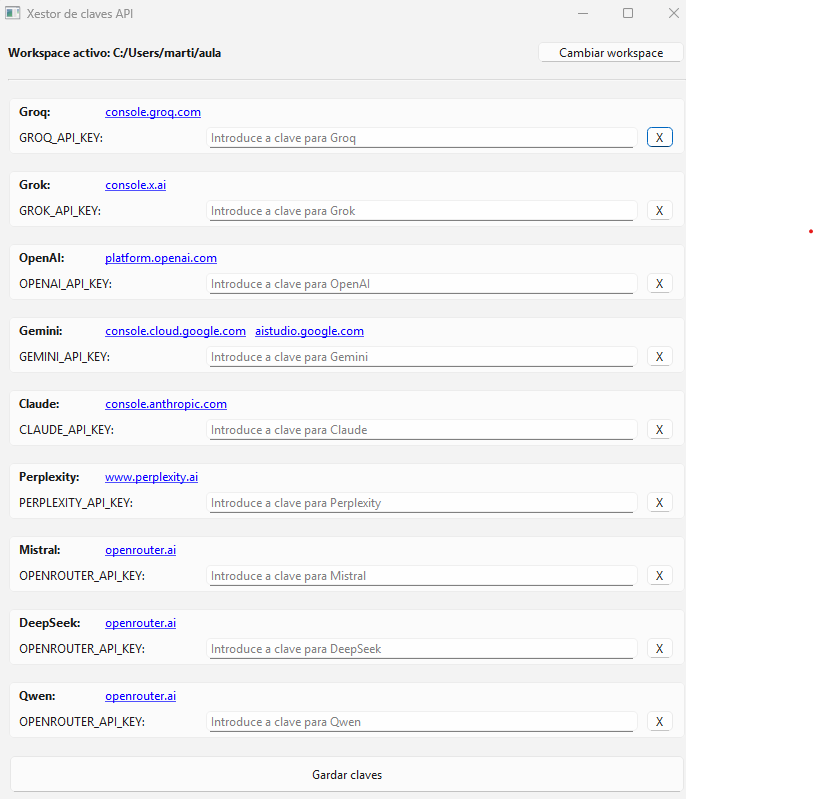
By clicking on the button 02.- Xestor api-key ia, you will have access to links for hiring various services. To start, I would recommend hiring Groq (free and very fast, with theoretical limits), Gemini, and DeepSeek (free up to a certain limit).
The procedure involves clicking on the blue hyperlinks that appear on the screen and creating your API Key. Once generated, copy it into the corresponding cell. The API Key will be saved in the .env file of your active workspace.
You must consider that you are handling very sensitive data, so it is essential to save them in a secure drive.
Let’s look at two examples for creating API keys:
https://wordpress.piztu.org/2025/08/26/groq_api_key/
https://wordpress.piztu.org/2025/08/26/paso-5b-grok_api_key/
To obtain an API key from Grok, go to the page https://console.gorq.com

- Click the “Login with Google” button if you want to register using your Google credentials.
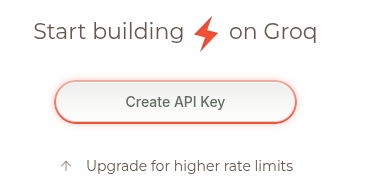
- Next, click on the “Create API Key” button.
3. The page will generate a key to access the Grok API. Copy this key to the clipboard by clicking the button on the right.

4. Paste the key into the AI api-key manager, which appears by clicking the “AI API-Key Manager” button.

5. To have the program save the key, click the “Save keys” button.

This Grok service is of good quality; however, it is a paid service. Depending on the quality you seek, it may be interesting to use this service. Therefore, you are not obliged to contract this service. The first time you use this service, you will need to enter your credit card information.
1. Go to the page https://console.x.ai/
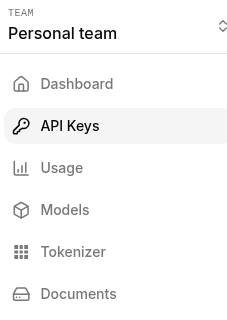
2. In the left column, select the second option: API Keys
3. Click on the Create API Key button

4. Add a name to remember the purpose of this key
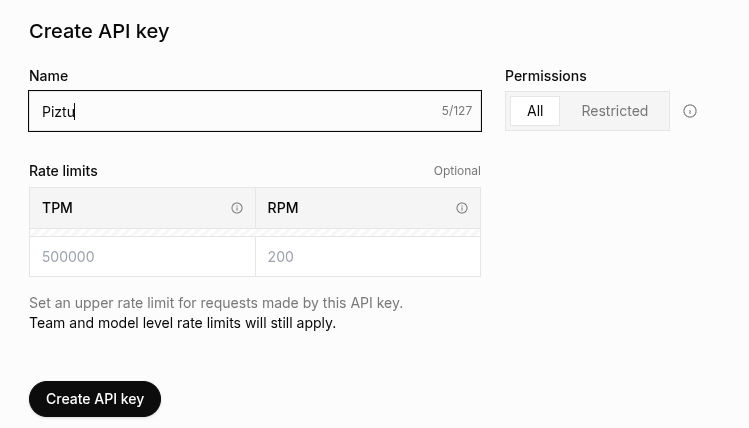
5. After clicking Create API Key, the system provides the key to be entered into the API key manager (click on button 02. API key manager)
Schedule
It is common for us to receive the schedule in a PDF file, as generated by programs like Peñalara or FET. To work with it, we need to convert that PDF into a table. You can do this manually or use an OCR program, such as Mistral, which is very useful for this task:
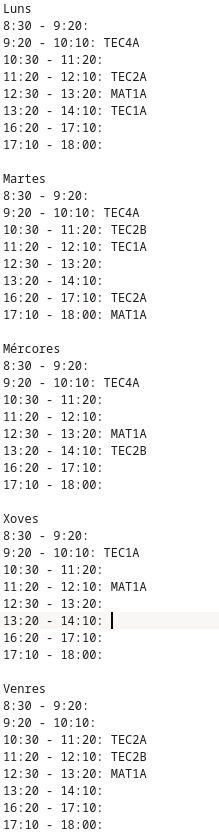
The final result will be a text file (with a .txt extension) with a format similar to the following, where only the hours of direct teaching will appear, without including duties, parent attention, department leadership, ICT support, etc.
In order to start practicing, you can download the following schedule file. It would be advisable to save it within the active workspace.
https://drive.google.com/file/d/13_Jq3WcdEC2KpPrqXoc2Ies8kJSxg872/view?usp=sharing
There is an element that is not provided by default: the Xade preset report. It’s a spreadsheet in .ods or .csv format, which is necessary for enrolling students in the Moodle virtual classroom. You should request it from the school management team or, if not possible, create it manually.
If you are provided with this file, it will have a structure similar to the following, and it is used for enrolling students in the Moodle virtual classroom:

You can download the following file with fictional data to practice the initial steps:
https://drive.google.com/file/d/1hnJARBtkfVajIB0NzpCI-f4UoHR4PzcY/view?usp=drive_link
Import Students and Course Creation
Now that we have the initial necessary data — the student list and the file with our teaching sessions — the magic begins!
Click on the 02. Import Students button.

Import Students and Course Creation
Generally, in step 1 you shouldn’t need to do anything. The script should automatically capture the workspace, meaning the folder where you want to save the information. In case of any errors, the application provides a button to manually select it.
In step 2, select the language model (LLM) of your choice. By default, Groq, a very fast LLM, is selected. However, sometimes it might not work properly, and the script may not generate the course folders correctly. If this happens, try another LLM: Gemini, ChatGPT, etc.
A question that might arise is whether the script sends the student data to artificial intelligence. The answer is negative. In fact, you can verify this yourself by uploading the script to an artificial intelligence and asking what data is sent, analyzing the code.
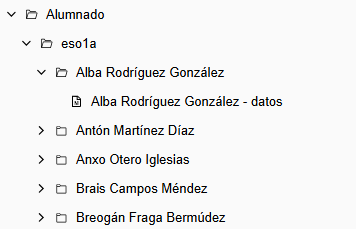
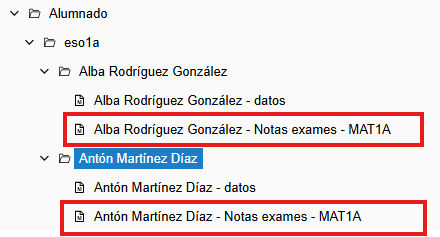
In step 3, select the student file, which is the .ods or .csv file provided by the administrative team or the one you created manually. Once selected, the program creates the groups, a folder for each student, and a note with their basic information (remember that the file I offer and the data shown in this manual are fictional). If you expand the data tree, the result will look something like this:
And the data note for each student looks like this:
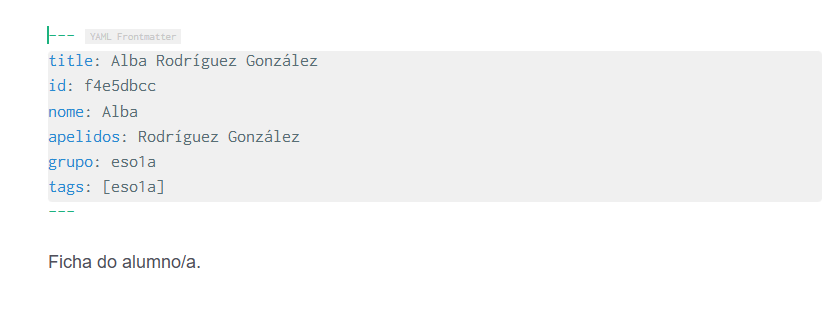
Each teacher can add any information they deem appropriate to that note. Moreover, more notes can be created manually to keep the information well-organized.
In step 4, by selecting the file schedule.txt (see step 6), you will get a list of the subjects that appear on your schedule. To the right of each subject, there will be a button with the text “Process Subject”.
By clicking that button, a new folder will be created for each subject. Inside this, there will be a subfolder for each month of the academic year. Within each monthly folder, the program will create a file for each class session, according to the official teaching calendar of Galicia for the 2025-2026 academic year and the schedule you selected.
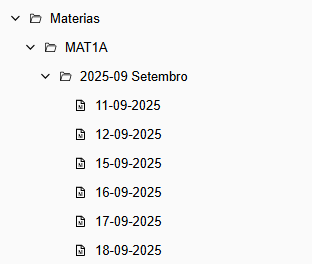
And opening a specific session, we see the following:
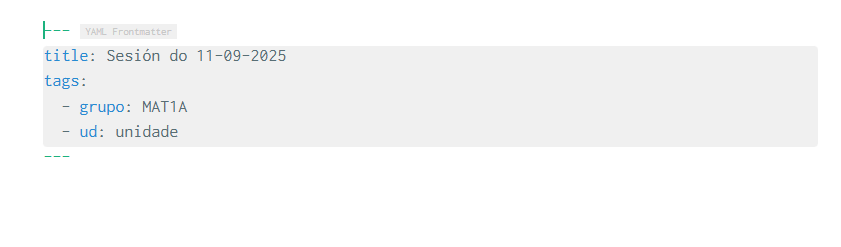
These notes will serve as a classroom diary. In the header, where it says “ud:”, you will enter the teaching unit you worked on during the session.
Later, we will see how to filter the information from this diary, both by date and by teaching unit.
Managing Files
Although the Piztu application already creates a data note for each student, it’s useful to have a system for creating as many notes as we want, such as: notes by subject, classroom annotations (absences, homework, behavior, participation, the notebook, etc.).
I am convinced that recording a correction or a calling out makes these actions more significant to the student, especially if they are reflected in tutoring reports. Oral corrections carry much less weight.
For example, we can create a file for notes on the subject of Technology. To do this, click the 03. File Manager button.
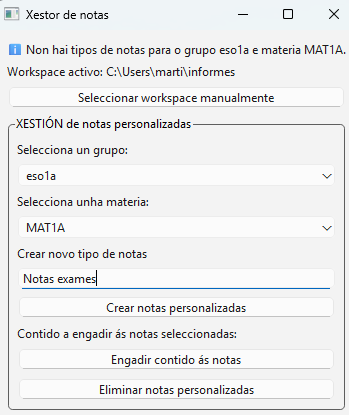
The script creates a note for each student in ESO1A and for the subject MAT1A.
Additionally, if you wish, you can add common text to all the notes you select. For example, you can input the text “Math exam notes”.
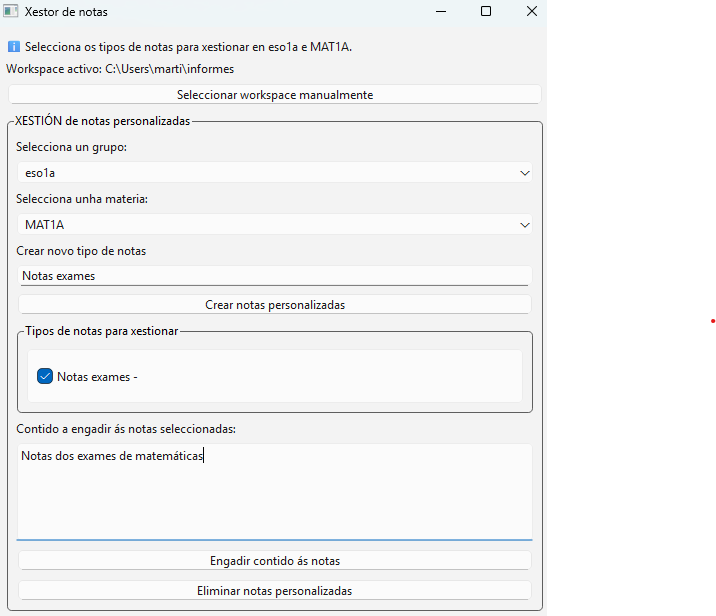
In the left column, we can see that a note for the math exams has been created.
If we open the notes, the following will be displayed:
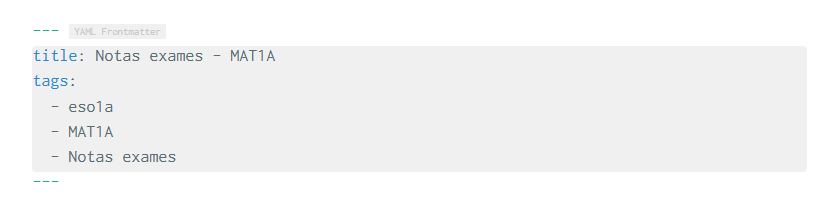
You can see that in the “title” tag, the personalized text you added earlier appears.
The script also allows you to delete template notes. Of course, you can also delete them manually from the file tree.
With the objective of learning how to input numerical grades into custom notes, a script was created to add random grades to students within a group and subject. Its purpose is purely educational.
To access the simulator, click the button 05. Grade Editor. Once the interface is open, click the button “Generate Random Grades”.
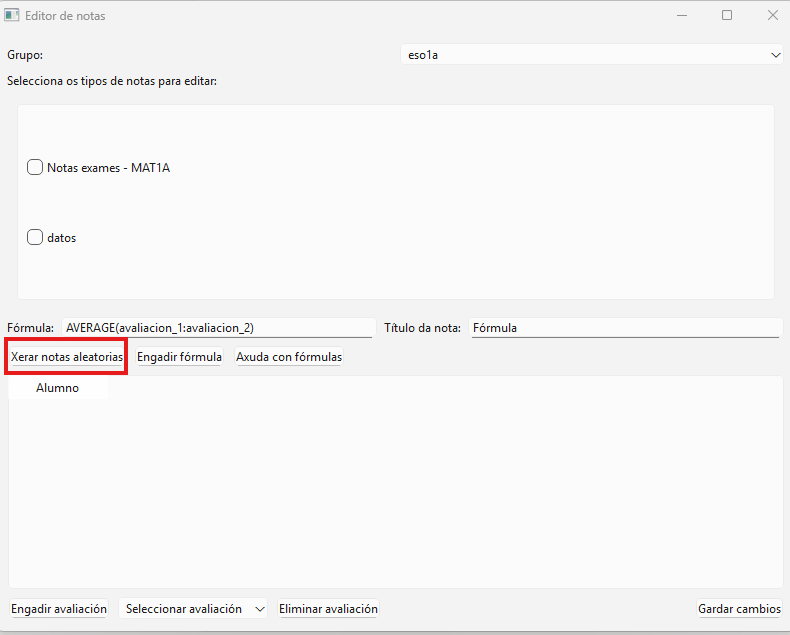
This window will appear at the back, and the Grade Editor will close.

Select the group and then the file where you wish to input random numerical grades, which are necessary to understand the next step of the manual.
Click on “Generate Random Grades” and you will see the result. For a fictional student and for the subject of Mathematics in group 1A, you will get a result similar to the following:
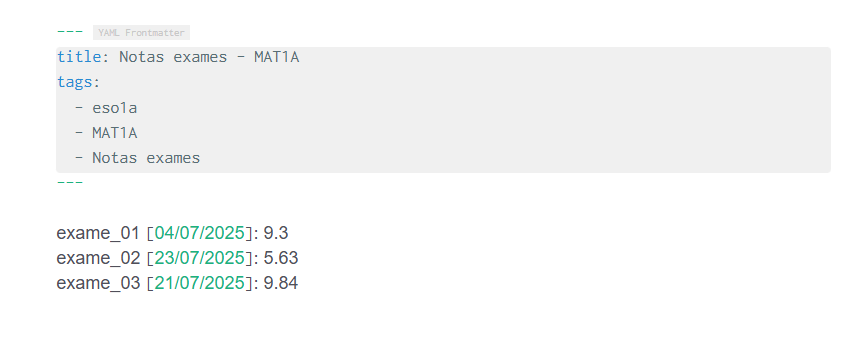
We can change the text that identifies the test or add others.
The assessment editor functions like a simple spreadsheet, designed for performing mathematical calculations such as computing averages.
To use it, click on the button 05. Editor assessment. Next, select the group and the grade you want to work with.
In this way, the grades you entered in step 10 will automatically appear, as you can see in the following image:
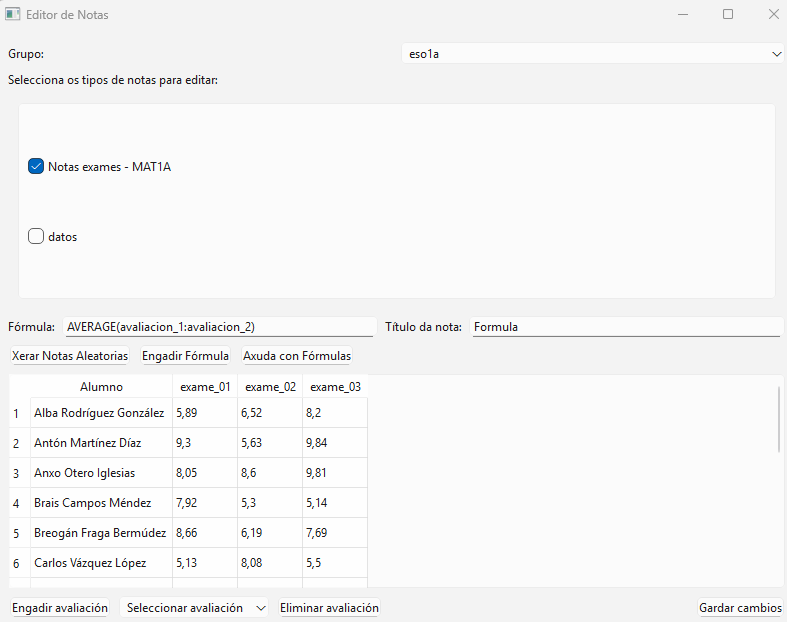
You can add a formula and give it any name you want. For example, to create the arithmetic mean of the notes from the three exams.
Click the “Student Report” button and the following interface will appear:
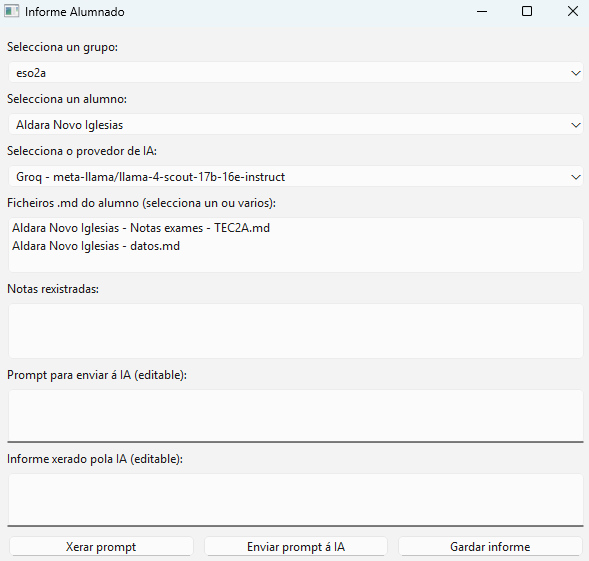
The first step is to select the group. You will notice that the script already filters the students of that specific group. Next, choose the AI provider.
Then, select the file with the exam grades. In this example, “Aldara Novo Iglesias – Exam Grades – TEC2A.md”. The grades will appear in the Registered Grades section, as you can see in the following image:
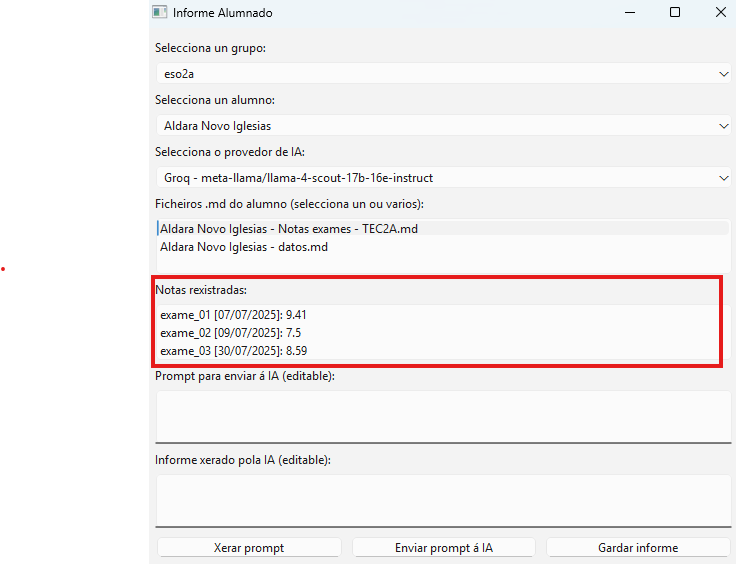
Click the “Generate Prompt” button. This will be the text sent to the artificial intelligence you selected.
You will see that the student’s name and surname are replaced by the text string “NAME SURNAME1 SURNAME2” to avoid sending identifiable data. The prompt is customizable, allowing each teacher to modify it according to their preferences.

In the final step, you receive the report generated by the artificial intelligence engine. In this fictional example for an imagined student, the result would be as follows:
The academic performance of Aldara Novo Iglesias in group eso2a was:

\- Exam 1: 9.41

\- Exam 2: 7.5

\- Exam 3: 8.59

Average score: (9.41 + 7.5 + 8.59) / 3 = 8.50

Therefore, the academic performance of Aldara Novo Iglesias in group eso2a was 8.50 out of 10.
If there is a variation in student performance based on grades, you might receive a report like the following:
The academic performance of Lara Paredes Seijas from group ESO2A shows notable performance in the first two exams, with a score of 8.95 in exam_01 (20/07/2025) and 8.75 in exam_02 (29/07/2025). However, in exam_03 (16/07/2025) she obtained a score of 5.79, indicating a decline in performance in this final exam. The average of the three scores is approximately 7.83, reflecting a good overall level, though with room for improvement.
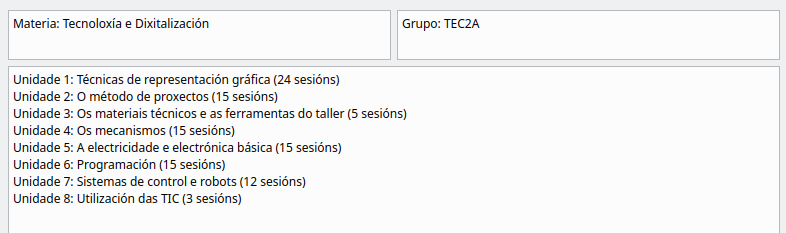
You need to create a folder in the left column for the educational programs. For example, for the subject of Technology and Digitalization, the structure might look like this:

- You will see that as many subfolders have been created as there are teaching units in the program.
- A general file for the subject is created, which includes the subject name, introduction, objectives, and a list of teaching units.
Phase 1: Gather the information
To complete the information in the folders, I recommend using NotebookLM (https://notebooklm.google.com/). This process is divided into two phases.
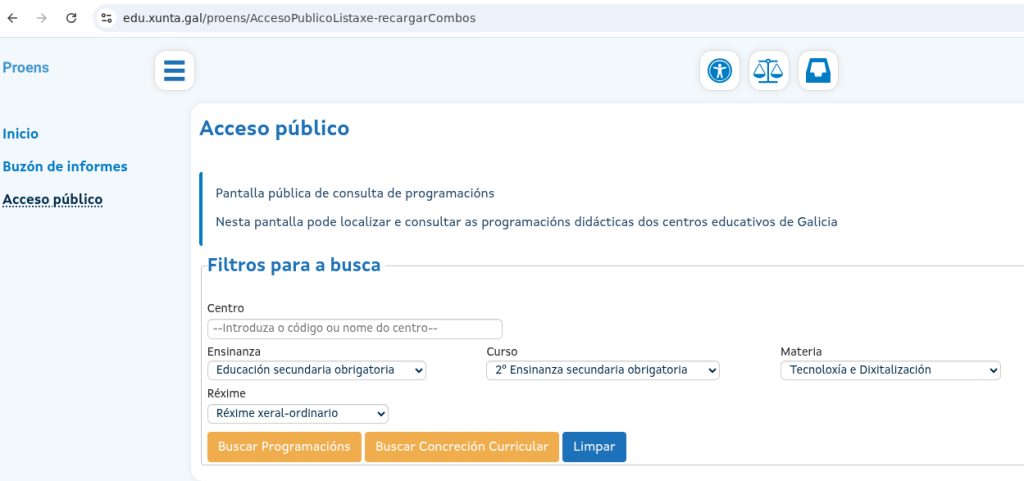
First, open NotebookLM and add the PDF file of the program or the public URL of your program. To obtain the public URL, follow these steps:
- Open the Proens application and go to the left column, where you will find “Public Access”.
- Enter your educational center, teaching level, course, and subject.
- Click on the “Search programs” button.
- Click the magnifying glass to open the program.
- Copy the URL that appears at the top of the browser.
Next, create a notebook in NotebookLM and add as sources the public URL you just obtained and/or the PDF you downloaded from Proens.
Also add to NotebookLM the file of the schedule and the URL (or PDF) of the Official Gazette of Galicia where the official educational calendar is defined.
For example, in the prompt you can paste the following:
### Enhanced Prompt

Based on the provided information (schedule and official calendar):

***

### I. General Subject Report

1. **Introduction**

2. **Subject Objectives**

3. **List of Teaching Units**

4. **Number of Sessions:** Calculate the total number of sessions for the 2024-2025 course using the schedule (3 weekly sessions) and the official educational calendar from Galicia to get the teaching days.

***

### II. Report for Each Teaching Unit

For each teaching unit, generate the following information:

1. **Number of Scheduled Sessions**

2. **Trimester** in which it will be taught.

3. **Planned Start Date:** Calculate the start date of the unit. Use the schedule and the official calendar, considering the scheduled sessions for each unit and their order of teaching.

4. **Planned End Date:** Calculate the end date by adding the scheduled sessions to the start date. Use the schedule and the official calendar.

5. **Description** of the teaching unit.

6. **Specific Learning Competences (S.L.C):** Identify competences from table 3.2, "Assessment Criteria" column. Also indicate the minimum requirements for each criterion if defined.

7. **Contents**

***

**IMPORTANT:**

* Generate the report entirely in Galician.

* The technology subject includes **3 weekly sessions**.

* The scheduled sessions are as indicated, without applying reduction or extension coefficients.

* Do not mention the session number or perform additional date calculations.
Once completed, NotebookLM will give you a report that you can save as a text file (.txt) in the folder of your choice.
To do this, use the “Copy” button so that the text does not include numbers referencing the source. Then, paste the information into a plain text editor (such as Kate, Gedit, or Notepad) and save the file with the .txt extension.
Next, in the right column of the Piztu interface in Zettlr, you will find the button 04_Programación. Once the script opens, follow these steps:
- Select the AI engine.
- Select the .txt file you just created.
- Click on “Analyze Document”.
- Finally, click on “Create Folder and Notes Structure”.
This way, the script automatically creates, inside the folder Programación_didáctica, a subfolder for the subject and, within it, a folder for each teaching unit.
It’s important to know that results may vary between different artificial intelligences, so you will need to assess which one is the most useful for you, considering the price.
Conclusion
Repeat this process for the other subjects you teach. Although the process may be somewhat laborious initially, you will surely benefit when you need to generate:
- The subject tracking reports by teaching unit.
- The department meeting minutes book.
- The final program report in June.
For programming, it is very useful to have a calendar of the entire course where non-teaching days are defined, according to the official educational calendar of the Autonomous Community.
Using the document generated in the previous section, where the didactic units and the sessions scheduled for each of them are listed:
- Unit 1: Graphical representation techniques (15 sessions)
- Unit 2: The project method (15 sessions)
- Unit 3: Technical materials and workshop tools (5 sessions)
- Unit 4: Mechanisms (15 sessions)
- Unit 5: Basic electricity and electronics (15 sessions)
- Unit 6: Programming (15 sessions)
- Unit 7: Control systems and robots (15 sessions)
- Unit 8: Use of ICT (5 sessions)
Moreover, using the file with the schedule, the program provides you with a global view of the course, where each didactic unit appears in a different color. The script assumes that the units are taught sequentially and does not adapt to situations where two units are worked on in parallel.
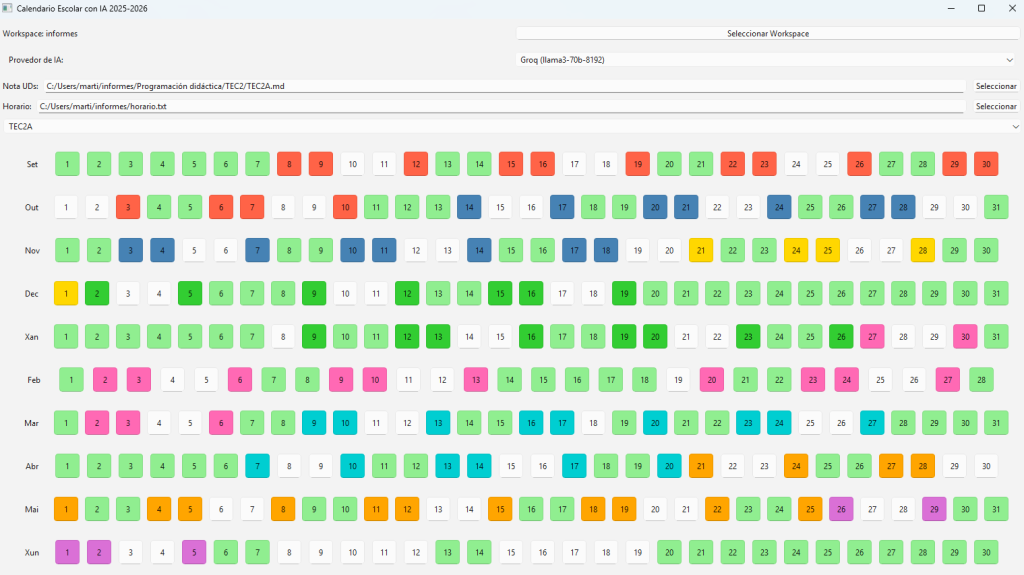
The boxes on the days when you do not teach the subject in that group appear blank, while non-teaching days appear in green.
Many teachers are used to struggling with traditional word processors: shifting formulas, unruly images, or nearly impossible-to-manage bibliographies. This is where LaTeX comes into play, a language designed precisely to avoid those headaches. And the best part? The result always looks professional, as if it were a book published by an academic publisher.
It’s true that the initial learning curve can be somewhat daunting: it’s not as simple as opening Word and starting to type. But the time you invest in learning it quickly pays off with the peace of mind of knowing that when you print or share the PDF, everything is perfect. And if that weren’t enough, you have a powerful ally: artificial intelligence.
One of the great advantages of editing with LaTeX is the ease of creating similar materials, like an exam derived from another or with a different difficulty level. You just need to gather several .tex files (for example, several exams) and ask the AI to create a new one based on them, adding the changes you deem necessary.
But before editing with Piztu, you need to install it on your computer:
If you use Windows, your ally is called MiKTeX. Go to its official website, download the “Basic Installer,” and follow the assistant (choose “install for anyone” and you’re done). When finished, open the console (cmd or PowerShell) and type xelatex –version. If you see the version, you’re set! And don’t forget to open the MiKTeX Console from time to time to update the packages (it’s as simple as clicking on “Check for updates” and “Update Now”).
If you’re on Debian or derivative distributions such as Ubuntu, it’s even easier. Open the terminal, and if you want to go all out, type:
sudo apt update
sudo apt install texlive-full
This gives you everything you need, although it takes up space. If you prefer something lighter, go with:
sudo apt update
sudo apt install texlive-base texlive-latex-extra texlive-xetex
Verify that everything works with xelatex –version. If you see the version, your LaTeX is ready to shine. Although before using it in Piztu, it is advisable to restart the computer.
Next, open Zettlr and create a LaTeX document in your workspace folder. To test it, you can use the following code, without worrying about the functionality of each instruction:
\documentclass[9pt]{scrartcl} % Paper size A4
\usepackage{amsmath} % For mathematical expressions
\usepackage{graphicx} % To insert images
\usepackage{tikz} % For drawing the square in the exponent
\usepackage{fancyhdr} % To customize headers and footers
\usepackage{lipsum} % To generate test text (you can remove this if not needed)
\usepackage{geometry} % To adjust the margins
\usepackage{multicol} % To use the multicols environment
\usepackage{setspace}
\usepackage{enumitem} % To adjust list tabulation
\usepackage{gfsneohellenicot} % Compile with xelatex - special mathematics
% Margin configuration according to APA standards
\geometry{top=1in, bottom=1in, left=0.5in, right=0.5in}
% Header and footer configuration
\pagestyle{fancy}
\fancyhf{} % Clear header and footer
\fancyhead[L]{Department of Mathematics. Practice 14. Operations with Integers} % Institute name centered in the header
\fancyhead[R]{\includegraphics[height=1.5cm]{logotipo.pdf}} % Logo in the right header
% Increase the distance between the header and the text
\setlength{\headsep}{50pt} % Change this value to adjust the spacing
% Adjust the height of the header
\setlength{\headheight}{46.28pt}
\addtolength{\topmargin}{-34.28pt}

% Additional package for full-width tables
\usepackage{array}
\usepackage{float} % package to keep tables within the correct section

% Redefine the \item command to add a space before each one
\setlist[enumerate]{itemsep=1.4em}
\graphicspath{{img/}}

\begin{document}

\begin{enumerate}

\item Plot and order from greatest to least the integers:
\[
3, -5, 14, -12, -6, 0, 7, -1, 2, -13.
\]

\subsection*{Number Line}
\begin{center}
\begin{tikzpicture}[scale=0.8]
    % Number line
    \draw[->] (-15,0) -- (15,0) node[below] {Integers};

    % Marks on the line
    \foreach \x in {-14,-13,...,14} {
        \draw (\x,0.1) -- (\x,-0.1);
        \node[below] at (\x,-0.2) {\x};
    }
\end{tikzpicture}
\end{center}

\item Fill in the symbols (<) or (>) as appropriate:

\begin{enumerate}
\begin{multicols}{4}
\item (-5 \ _ \ 4)
\item (+3 \ _ \ -1)
\item (-6 \ _ \ -4)
\item (-3 \ _ \ -2)
\item (0 \ _ \ +3)
\item (-9 \ _ \ 0)
\item (+6 \ _ \ -11)
\item (+5 \ _ \ -3)
\item (-1 \ _ \ +6)
\item (+8 \ _ \ -8)
\item (-3 \ _ \ -7)
\item (+4 \ _ \ +8)
\end{multicols}
\end{enumerate}

\item Complete the tables:

\begin{multicols}{2}

    \[
    \begin{array}{|c|c|}
    \hline
    \textbf{Number} & \textbf{Absolute Value} \\
    \hline
    +6 &  \\
    \hline
    -5 &  \\
    \hline
    0 &  \\
    \hline
    +3 &  \\
    \hline
    +1 &  \\
    \hline
    -7 &  \\
    \hline
    +2 &  \\
    \hline
    0 &  \\
    \hline
    \end{array}
    \]

    \[
    \begin{array}{|c|c|}
    \hline
    \textbf{Number} & \textbf{Opposite} \\
    \hline
    +6 &  \\
    \hline
    -5 &  \\
    \hline
    0 &  \\
    \hline
    +3 &  \\
    \hline
    +1 &  \\
    \hline
    -7 &  \\
    \hline
    +2 &  \\
    \hline
    0 &  \\
    \hline
    \end{array}
    \]

\end{multicols}

\item Calculate:

    \begin{enumerate}
        \begin{multicols}{3}
        \item $\lvert +9 \rvert + \lvert -9 \rvert =$
        \item $\lvert -4 \rvert - \lvert -5 \rvert =$
        \item $\lvert +3 \rvert + \lvert -5 \rvert =$
        \item $\lvert 6 \rvert + \lvert -6 \rvert =$
        \item $\lvert -7 \rvert - \lvert 7 \rvert =$
        \item $\lvert 6 \rvert \cdot \lvert -2 \rvert =$
        \item $\lvert 0 \rvert =$
        \item $\lvert -3 \rvert - \lvert -8 \rvert =$
        \item $\lvert 5 + (-5) \rvert =$
    \end{multicols}
    \end{enumerate>

\item Calculate

    \begin{enumerate}
This also requires you to save the logo.pdf in the same folder where you copy the code, as it appears in the document's preamble:
\fancyhead[R]{\includegraphics[height=1.5cm]{logotipo.pdf}} % Logo in the right header
You can download it from this page if you want to test the functionality:
https://drive.google.com/file/d/1aQ0GfUOP64uXrVJhxTgj8tqCFOHvUWGJ/view?usp=sharing
Next, you press File > Export and choose the PDF (XeLaTeX) (command) option and select "Current directory" and click Export. The program generates the file in PDF format in the same folder as the .tex file.
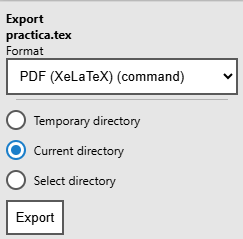
practica
With Piztu, you can use a classroom journal. This way, you can record the notes of each session, such as the didactic unit, activities, and contents worked with the group.
To do this, follow these steps:
- Go to the left column.
- Expand the
Subjectsfolder. - Open the subfolder of your group.
- Enter the folder for the corresponding month.
- Finally, open the file with the session date.
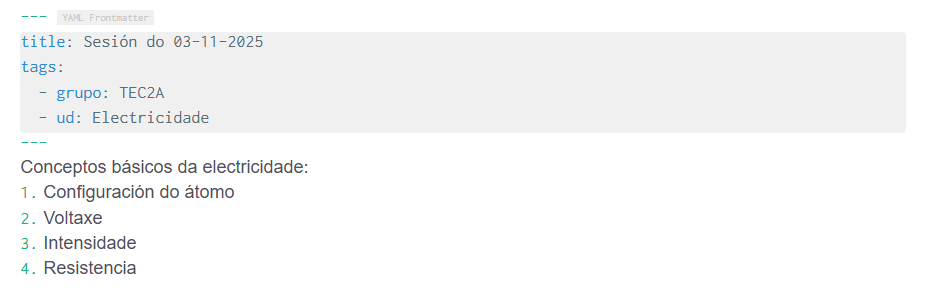
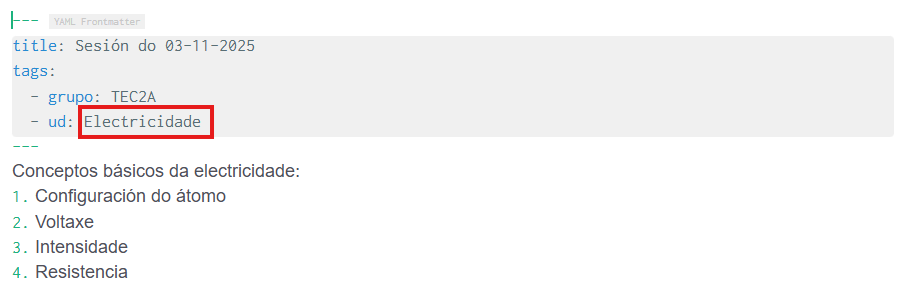
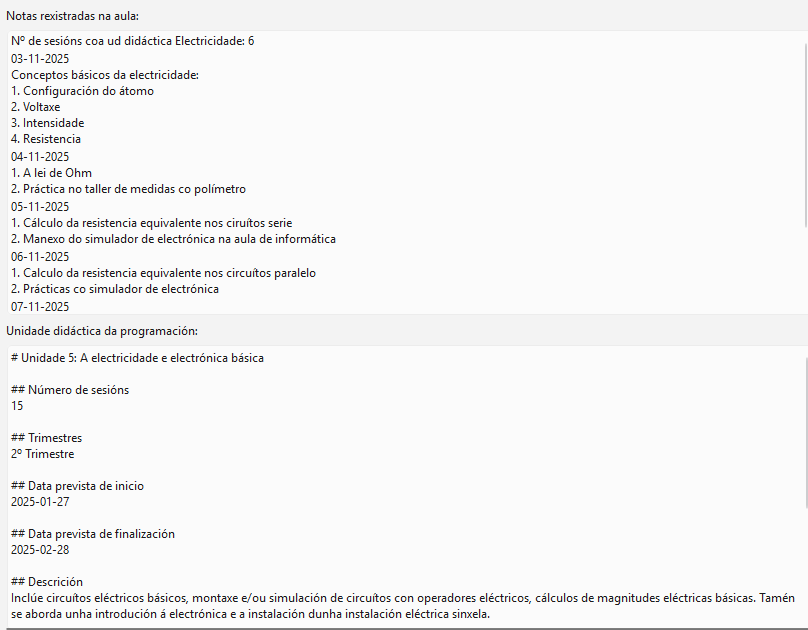
The first thing you need to do is fill in the header (YAML code) with the didactic unit you worked on in that session. For example: Electricity.

And then in the body of the note, the specific contents of the didactic unit.
In this way, you can continue to complete the information for all your class sessions.
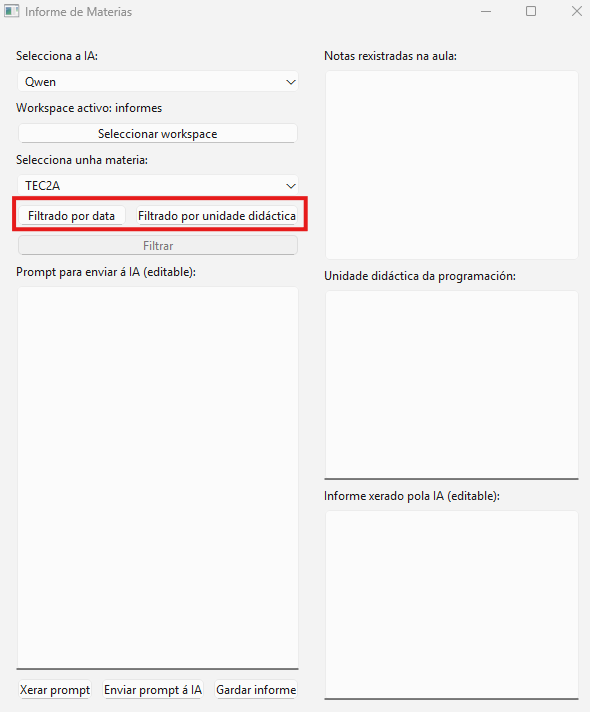
Report Generation
Open the script Subject Report. The first step is to choose your preferred LLM and then the subject.
From there, you can filter the information to obtain two types of reports:
- By date: You will get a report useful for completing the department’s records book.
- By didactic unit: You will get a report that will help you follow up by didactic unit in Proens.
A. Filtering by Date
If you want to get the information to complete the records book, select the dates from the first to the last day of the month.
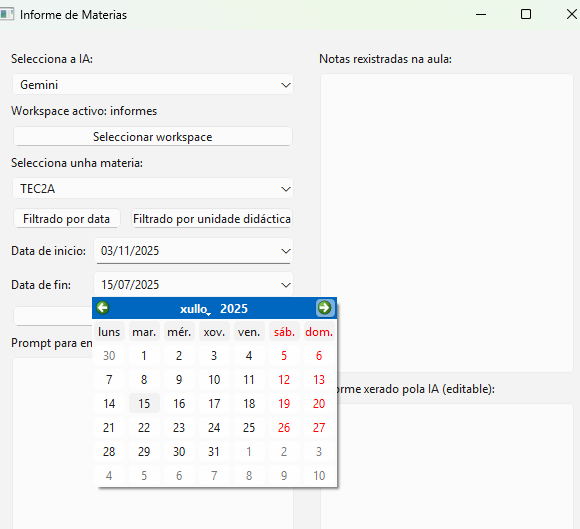
The script scans all the notes published in the corresponding subject. By clicking the “Filter” button, the notes will appear in the Registered Notes box.
To use the application’s predefined prompt, click the “Generate Prompt” button.
Finally, click the “Send Prompt to AI” button. The LLM will return the report generated according to the instructions you defined in the prompt and the characteristics of the AI provider. The result could be the following:
The TEC2A didactic unit began on November 3, 2025, and extended until November 28 of the same year. During this period, various contents and activities related to electricity and electrical circuits were worked on, combining theory, practices, and the use of digital tools. On the first day, November 3, basic concepts of electricity such as atomic configuration, voltage, current, and resistance were introduced. On November 4, Ohm's Law was studied and a workshop practice was conducted to measure with a multimeter. On November 5, the calculation of equivalent resistance in series circuits was worked on, using an electronic simulator in the computer lab. On November 6, the calculation of resistances in parallel circuits continued, also with simulator practices. On November 7, mixed circuits were addressed and a practical workshop activity was conducted, consisting of wiring a model house made of foam board. Finally, on November 10, a practice with basic exercises of simple electrical circuits was solved, applying fundamental calculations. This set of activities allowed students to reinforce theoretical knowledge through practice and the use of specialized tools.B. Filtering by Didactic Unit
If you wish to filter the information by didactic unit, you will see that the interface changes slightly. The goal in this case is to compare what was worked on in the classroom with the programming.
To do this, click “Filtering by Didactic Unit”.
Important: When you enter the didactic unit, you must use the same term you used in the note headers.
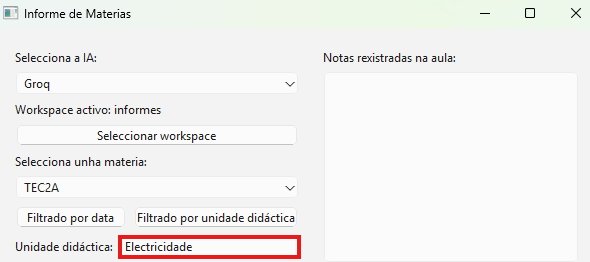
By clicking the “Filter” button, you will see that all the notes with the term “Electricity” in the header (YAML) appear in the “Registered Classroom Notes” box, in this example.
Additionally, the script queries the Programming folder and the TEC2A subfolder for the didactic unit related to that term. It then retrieves the programming data for that didactic unit and displays it in the “Programmed Didactic Unit” box.
Continue by clicking “Generate the prompt” to obtain a reference prompt that you can personalize.
Then, click “Send Prompt to AI”. The result could be the following:
Comparing the content of the programmed didactic unit for the TEC2A subject on "Electricity" with the registered classroom notes, there is a high degree of achievement of the objectives set in the programming, although with execution concentrated in a shorter period than expected. The programming contemplates 15 sessions between January 27 and February 28, 2025, while the notes reflect activities conducted between November 3 and November 10, 2025, covering the main content in just 6 sessions. The topics addressed in the notes, such as basic electricity concepts (voltage, current, resistance), Ohm's Law, equivalent resistance calculations in series, parallel, and mixed circuits, and workshop and simulator practices, align with the unit description, which includes basic electrical circuits, calculations of electrical magnitudes, and assembly or simulation of circuits. Moreover, the practice of wiring a model house reflects the objective of designing simple installations, meeting the evaluation criteria related to the design and assembly of basic circuits (CA3.1.3, CA3.2.2). However, there is no mention in the notes of content related to the introduction to electronics or the use of digital tools for technical documents (CA5.1.2, CA5.3.3), suggesting that some aspects of the programming may be pending development or not recorded on these dates. In summary, the execution seems effective in fundamental practical and theoretical electricity content but would need to complete aspects related to electronics and digital document elaboration to fully achieve the programmed objectives.The generated report is likely not to adapt directly to the follow-up of each didactic unit of the Proens application. Therefore, you will need to adapt the prompt until you get a report that suits you.
Since you can save these reports as you generate them, by the end of the course you will have a set of appropriate texts to generate the Subject Report, which you also need to reflect in the Proens application. Due to the text size being limited to a number of characters, you might use artificial intelligence to summarize and adapt it to the available space.
In summary, this application is a tool that, on one hand, forces you to enter the tasks and content worked on in each session, creating a classroom journal, and on the other hand, facilitates the editing of tracking reports.
Since the data collected in the application is sensitive, we must pay close attention to where we can store it.
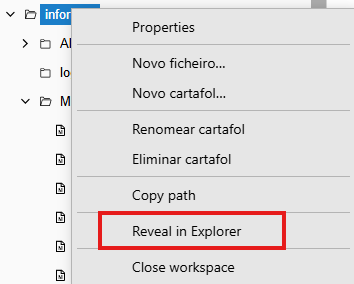
The first way to back up is by copying and pasting the workspace folder to another drive, such as a USB disk. We should handle it with great care. To find the path where the Workspace is located, right-click on the main element and choose the “Reveal in Explorer” option.
A second way to back up is by using the services that the Department of Education provides to teachers. As they are servers of the Department, this administration is responsible for the data file.
https://abalarbox.edu.xunta.gal
Once inside the application and after using personal “edu” credentials, we go to the settings button:
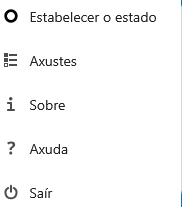
In the settings section, click on “Sharing”
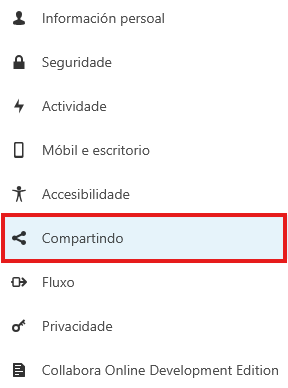
On the right, there is a button to copy the “federated cloud id,” which will have a similar format to the following and will be different for each user:
3ba552d2-0177-102d-8da9-27e9a9f3b0d5@abalarbox.edu.xunta.gal
From this id, we will define the WebDAV connection URL with a format like the following:
https://abalarbox.edu.xunta.gal/remote.php/dav/files/3ba552d2-0177-102d-8da9-27e9a9f3b0d5
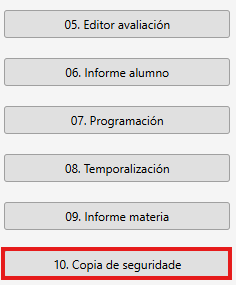
Next, we will click on the button labeled 10. Backup:
In the window that appears, we fill out the form with our data, making sure that the WebDav URL is the one you just created, and the user and password correspond to the edu service. We can click on “Remember” so we don’t have to enter this data each time we perform a backup.

Finally, we will click on Upload to Abalarbox. It’s not a quick process, so we will let it work while we perform another task.
To download the copied folder, we will do so from the AbalarBox web interface.