
Many teachers are used to struggling with traditional word processors: shifting formulas, unruly images, or nearly impossible-to-manage bibliographies. This is where LaTeX comes into play, a language designed precisely to avoid those headaches. And the best part? The result always looks professional, as if it were a book published by an academic publisher.
It’s true that the initial learning curve can be somewhat daunting: it’s not as simple as opening Word and starting to type. But the time you invest in learning it quickly pays off with the peace of mind of knowing that when you print or share the PDF, everything is perfect. And if that weren’t enough, you have a powerful ally: artificial intelligence.
One of the great advantages of editing with LaTeX is the ease of creating similar materials, like an exam derived from another or with a different difficulty level. You just need to gather several .tex files (for example, several exams) and ask the AI to create a new one based on them, adding the changes you deem necessary.
But before editing with Piztu, you need to install it on your computer:
If you use Windows, your ally is called MiKTeX. Go to its official website, download the “Basic Installer,” and follow the assistant (choose “install for anyone” and you’re done). When finished, open the console (cmd or PowerShell) and type xelatex –version. If you see the version, you’re set! And don’t forget to open the MiKTeX Console from time to time to update the packages (it’s as simple as clicking on “Check for updates” and “Update Now”).
If you’re on Debian or derivative distributions such as Ubuntu, it’s even easier. Open the terminal, and if you want to go all out, type:
sudo apt update
sudo apt install texlive-full
This gives you everything you need, although it takes up space. If you prefer something lighter, go with:
sudo apt update
sudo apt install texlive-base texlive-latex-extra texlive-xetex
Verify that everything works with xelatex –version. If you see the version, your LaTeX is ready to shine. Although before using it in Piztu, it is advisable to restart the computer.
Next, open Zettlr and create a LaTeX document in your workspace folder. To test it, you can use the following code, without worrying about the functionality of each instruction:
\documentclass[9pt]{scrartcl} % Paper size A4
\usepackage{amsmath} % For mathematical expressions
\usepackage{graphicx} % To insert images
\usepackage{tikz} % For drawing the square in the exponent
\usepackage{fancyhdr} % To customize headers and footers
\usepackage{lipsum} % To generate test text (you can remove this if not needed)
\usepackage{geometry} % To adjust the margins
\usepackage{multicol} % To use the multicols environment
\usepackage{setspace}
\usepackage{enumitem} % To adjust list tabulation
\usepackage{gfsneohellenicot} % Compile with xelatex - special mathematics
% Margin configuration according to APA standards
\geometry{top=1in, bottom=1in, left=0.5in, right=0.5in}
% Header and footer configuration
\pagestyle{fancy}
\fancyhf{} % Clear header and footer
\fancyhead[L]{Department of Mathematics. Practice 14. Operations with Integers} % Institute name centered in the header
\fancyhead[R]{\includegraphics[height=1.5cm]{logotipo.pdf}} % Logo in the right header
% Increase the distance between the header and the text
\setlength{\headsep}{50pt} % Change this value to adjust the spacing
% Adjust the height of the header
\setlength{\headheight}{46.28pt}
\addtolength{\topmargin}{-34.28pt}

% Additional package for full-width tables
\usepackage{array}
\usepackage{float} % package to keep tables within the correct section

% Redefine the \item command to add a space before each one
\setlist[enumerate]{itemsep=1.4em}
\graphicspath{{img/}}

\begin{document}

\begin{enumerate}

\item Plot and order from greatest to least the integers:
\[
3, -5, 14, -12, -6, 0, 7, -1, 2, -13.
\]

\subsection*{Number Line}
\begin{center}
\begin{tikzpicture}[scale=0.8]
    % Number line
    \draw[->] (-15,0) -- (15,0) node[below] {Integers};

    % Marks on the line
    \foreach \x in {-14,-13,...,14} {
        \draw (\x,0.1) -- (\x,-0.1);
        \node[below] at (\x,-0.2) {\x};
    }
\end{tikzpicture}
\end{center}

\item Fill in the symbols (<) or (>) as appropriate:

\begin{enumerate}
\begin{multicols}{4}
\item (-5 \ _ \ 4)
\item (+3 \ _ \ -1)
\item (-6 \ _ \ -4)
\item (-3 \ _ \ -2)
\item (0 \ _ \ +3)
\item (-9 \ _ \ 0)
\item (+6 \ _ \ -11)
\item (+5 \ _ \ -3)
\item (-1 \ _ \ +6)
\item (+8 \ _ \ -8)
\item (-3 \ _ \ -7)
\item (+4 \ _ \ +8)
\end{multicols}
\end{enumerate}

\item Complete the tables:

\begin{multicols}{2}

    \[
    \begin{array}{|c|c|}
    \hline
    \textbf{Number} & \textbf{Absolute Value} \\
    \hline
    +6 &  \\
    \hline
    -5 &  \\
    \hline
    0 &  \\
    \hline
    +3 &  \\
    \hline
    +1 &  \\
    \hline
    -7 &  \\
    \hline
    +2 &  \\
    \hline
    0 &  \\
    \hline
    \end{array}
    \]

    \[
    \begin{array}{|c|c|}
    \hline
    \textbf{Number} & \textbf{Opposite} \\
    \hline
    +6 &  \\
    \hline
    -5 &  \\
    \hline
    0 &  \\
    \hline
    +3 &  \\
    \hline
    +1 &  \\
    \hline
    -7 &  \\
    \hline
    +2 &  \\
    \hline
    0 &  \\
    \hline
    \end{array}
    \]

\end{multicols}

\item Calculate:

    \begin{enumerate}
        \begin{multicols}{3}
        \item $\lvert +9 \rvert + \lvert -9 \rvert =$
        \item $\lvert -4 \rvert - \lvert -5 \rvert =$
        \item $\lvert +3 \rvert + \lvert -5 \rvert =$
        \item $\lvert 6 \rvert + \lvert -6 \rvert =$
        \item $\lvert -7 \rvert - \lvert 7 \rvert =$
        \item $\lvert 6 \rvert \cdot \lvert -2 \rvert =$
        \item $\lvert 0 \rvert =$
        \item $\lvert -3 \rvert - \lvert -8 \rvert =$
        \item $\lvert 5 + (-5) \rvert =$
    \end{multicols}
    \end{enumerate>

\item Calculate

    \begin{enumerate}
This also requires you to save the logo.pdf in the same folder where you copy the code, as it appears in the document's preamble:
\fancyhead[R]{\includegraphics[height=1.5cm]{logotipo.pdf}} % Logo in the right header
You can download it from this page if you want to test the functionality:
https://drive.google.com/file/d/1aQ0GfUOP64uXrVJhxTgj8tqCFOHvUWGJ/view?usp=sharing
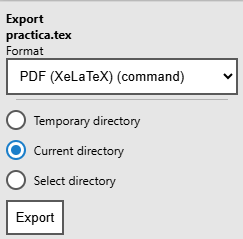
Next, you press File > Export and choose the PDF (XeLaTeX) (command) option and select "Current directory" and click Export. The program generates the file in PDF format in the same folder as the .tex file.
practica